Easy IOT based home automation system using Blynk
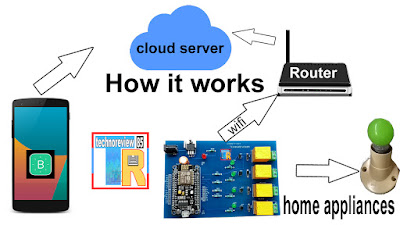
It is a tutorial about Iot based home automation using Blynk How it works : Here I make a customized circuit board to control 4 relays by esp8266 NodeMcu This circuit runs on DC 12 volt 1 amp power. when power on nodemcu connect to you router via WiFi & also connect with Blynk server Your smart phone send command to Blynk server & Blynk cloud server send command to nodemcu . The D0,D2,D3,D4 pin of nodemcu became high or low then relay turn on or off connected Ac appliances. You Need to make : Customized pcb ( I make pcb from https://jlcpcb.com They offer 10 PCBs in $2 Download gerber file from here & upload to jlcpcb website .build time 48 hours ) Esp 8266 NodeMcu Lolin 12v 1 amp power adapter Ic 7805 - 1 pcs Transistor Bc 548b - 4 pcs Resistors 10K - 4 pcs & 1K - 5pcs Diode IN4007 - 4pcs Relay 12V - 4pcs Led red - 1pcs & green - 4 pcs Capacitor 470uf/25V - 1pcs Female Header connector Terminal block - 4pcs Making :