Easy IOT based home automation system using Blynk
It is a tutorial about Iot based home automation using Blynk
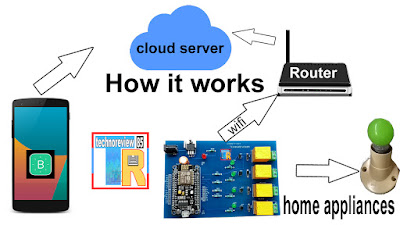


How it works :
Here I make a customized circuit board to control 4 relays by esp8266 NodeMcu
This circuit runs on DC 12 volt 1 amp power.
when power on nodemcu connect to you router via WiFi & also connect with Blynk server
Your smart phone send command to Blynk server & Blynk cloud server send command to
nodemcu .
The D0,D2,D3,D4 pin of nodemcu became high or low then relay turn on or off connected Ac appliances.
You Need to make :
- Customized pcb ( I make pcb from https://jlcpcb.com They offer 10 PCBs in $2 Download gerber file from here & upload to jlcpcb website .build time 48 hours )
- Esp 8266 NodeMcu Lolin
- 12v 1 amp power adapter
- Ic 7805 - 1 pcs
- Transistor Bc 548b - 4 pcs
- Resistors 10K - 4 pcs & 1K - 5pcs
- Diode IN4007 - 4pcs
- Relay 12V - 4pcs
- Led red - 1pcs & green - 4 pcs
- Capacitor 470uf/25V - 1pcs
- Female Header connector
- Terminal block - 4pcs

Making :
we are using professional quality PCB so making is very easy
just put all parts to pcb (All parts name printed on PCB)
Solder all components & cut extra lid of parts.


PCB is complete

Circuit Diagram of Iot based Home automaton System
Software Part:
Download & install Blynk app in your android phone
sing-up to Blynk using a email id
Then create a new project & select board Nodemcu ( you can see Video)
After creating a new project Blynk will send a Authentication code in your email Id
copy this code
Now go to your pc You need Arduino Ide to program node mcu
If you have not use Nodemcu before it ,then you have to download Esp 8266 nodemcu board from
Board manager of arduino ide (Here is a guide for add Nodemcu to arduino ide)
Then Download Blynk library from here
Now open Arduino Ide go to Examples>Blynk >Boards_wifi>NodeMcu

Just put your Auth Code (witch you received in email) ,your Router name & password
Upload code to Nodemcu

Now open Blynk app on your phone
Add 4 buttons using pin D0,D2,D3,D4


congratulation you complete software part .
Now connect Ac appliances with circuit board .follow connection diagram below

Now plug power of 12v adapter and you can control lights or fan using Blynk app button


Gerber file not view
ReplyDeletePlease help me
DeleteYou can see download button on top right corner,just click that and upload to jlcpcb for pcb
DeleteArrows RC airplane
DeleteAtten soldering gun
FMS RC jet
Kerui GSM alarm
Freewing RC jet
Hobbystar Motor
All procedure I did but it shows "wasn't online yet " even it shows 1 device is connected to hotspot.
ReplyDeletePlease help me.
hi i am your subcriber need some help for the pcb desing as a file
ReplyDelete